News:

Available now!.. "Down the Rhodes: The Fender Rhodes Story" (book & documentary) More...

Main Menu
Menu

Show posts

This section allows you to view all posts made by this member. Note that you can only see posts made in areas you currently have access to.

Show posts Menu

Messages - Ben Bove

#1
The stage piano with a guitar amp - a Twin Reverb, a JC 120 - they are already "preamped" and that's its own sound.  I personally don't recommend adding another preamp on top of those amplifiers because they would both add treble and bass EQ that collectively colors the sound.  It's also difficult to work with a stereo set up.

The best route in my opinion is to pair one of these preamps with 12" PA speakers / powered monitors for true stereo vibrato.  These will take the accurately developed EQ of these preamps and correctly amplify them.  Any good set of PA speakers / monitors are also cheaper than 2 guitar amps.  They can also be at ear level which is an incredible experience compared to a suitcase cabinet at your knees.

I personally own Nir's preamp and VV's.  They are exceptional. 
#2
Spot on.  if there's excessive movement left-to-right, where a hammer runs into the other, then one of the hammer hinge pins is probably broken off but still in the flange (so it looks fine).
#3
This sounds like a power supply regulator assembly issue.  With your multimeter, I would unplug both amp modules from the supply, and test the pins inside the connectors.  Referring to the schematic, you should be getting readings around +35, +25, and -35 for both. 

Does the Rhodes make sound on channel 2, no matter which amp module is plugged into it?  That will help you rule out a bad amp module - that you can swap either out on a good channel.
#4
The lateral shimming you talk about was done at the factory.  During this era, that's how they dealt with alignment of a wood action frame piano.  Replacing the harp support may be a good idea, depending how good the glue job was.  It can change the escapement of the bass section of the piano due to a height difference.

I'm not sure if I follow you on the key dip / key pedestal felt question.  Your era of piano with wooden harp supports, would have key pedestal felts (not hammer cam felts).  When doing the miracle mod, you'll want to remove the key pedestal felts, do the bump mod, and reinstall new key pedestal felts.  If there are no felts between the key pedestal and hammer currently, this will allow the keys to dip lower than they should when depressed. 
#5
The grime on the side of the keys is from hands dragging :) If you notice, it's only down far enough between the keys where a hand could touch it.  I'm sure you'll see that it's deepest towards the front of the key (furthest travel down), and trangularly gets smaller as it goes back.
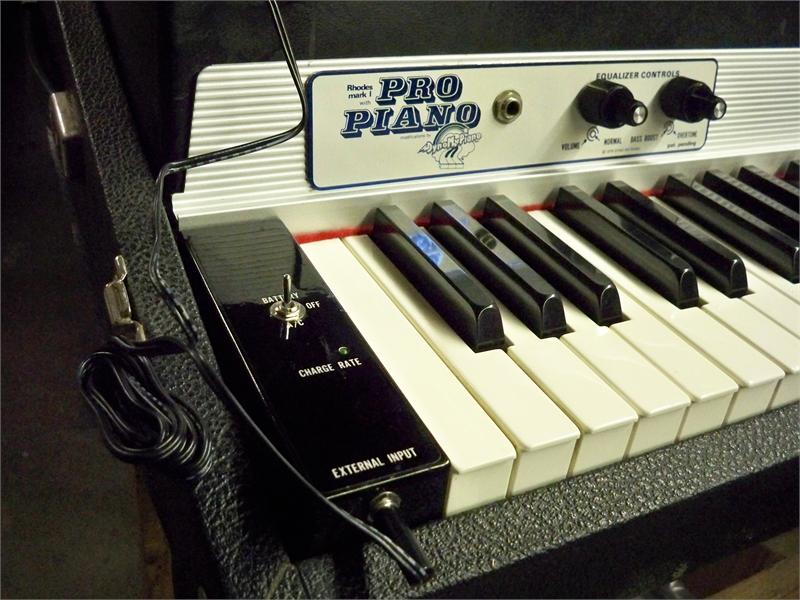
Usually the smell from Rhodes comes from the tolex - give it a good smell up close.  It's a porous material, and everything else in the piano is mostly covered - by the harp lid, by plastic key caps, etc. which usually keeps the smell in.  So your best bet would be to clean the tolex with something like an orange cleaner or something that's not too harsh but has deodorizing properties.  You can always test on the inside of the case lid or some other area which isn't readily seen in case it does affect the material or color of the tolex.

#6
A few months late - but yes  :)
#7
Good news, it looks like a new CEO is at Photobucket, and they've reversed the photos held ransom.  I've checked a few forum posts, and the photos are showing up again.

Great to see our work has come back.
#8
for the plastic key pin sections, on this 88 I recently worked on, they just cut a section for the remainder of bass notes.
#9
Great.  Also, instead of hammer tip shims, we have the luxury of different sets of hammer tips that Vintage Vibe sells.  The aluminum frame pianos have factory hammer tips that have various heights - shortest in the bass, up to tallest in the wood core.  So, you could purchase the "square tip" older version of the hammer tips from the early 70s, which would be taller, and put those in the bass section.  That would eat up some of the big escapement

#10
I would definitely agree that this amp is a candidate for rebuild.  The electrolytic capacitors alone (black) are well past the intended life expectancy.  Even if they were quality Sprague!

The question would be if you're comfortable removing components and soldering.  If not, I would recommend a rebuilding service.  It's straightforward enough with the rebuild kit, so any decent electronics repair shop or "guitar amp guy" could do a rebuild.
#11
Take a look on reverb, I believe there are a couple sections for sale.

You may be able to find the broken pins inside the piano, or broken off inside the bottom of the key itself.  You can position the broken pin to match up with the way it broke off from the channel, and superglue it in.  Otherwise, you can drill a hole and insert a replacement pin of some kind that is of the same height and width (i.e. from a cabinet shelf, etc.)
#12
Bill Evans - From Left to Right, confirmed from that era because of album cover, and best example of that era
#13
It went for a ride on a boat and is currently living in Norway :)
#14
Yes what Steveo said about the dampers - the bolts can go above the reed bar shield.  The holes in the reed bar shield are drilled out wide enough that they can sit higher.

If you have a heavy keyboard on top of a wurlitzer, you may notice that the lid is actually hitting the back of the black keys (sharp keys), and making a mechanical clacking noise.  Setting the bolts higher will prevent the lid from flattening out, and running into the back of the keycaps.

You can sort of see in this photo that the bolts are slightly above the reed bar shield, especially the right one.  Couldn't quickly find one from a horizontal view.

#15
Hi, thanks for the video.  Always helps in diagnosing problems.  First off, let us know the steps you're doing to adjust the escapement - are you noticing the problem is worse or better in certain cases?

There are a couple different things going on, but pay attention to the 2 parts of any strike - does the noise happen when you hit a key (happens on attack), or does it only happen on release of a key, after attack.  I'm hearing a couple notes that have mechanical noise when you release after an attack, then on some other notes, I'm hearing mechanical buzzing or other noises on initial attack only.  Those are two separate issues.

You may want to play some of these notes with the sustain pedal down, and that will help you differentiate what happens on attack or release, as the sustain pedal will eliminate the dampers on release from the equation.

Anything that's strictly a buzz on attack - check for tonebars touching neighboring tonebars, or the metal braces.  For bass/low notes, it could be tines swinging high enough to contact a neighboring tonebar.  See if moving the tonebars temporarily by hand clears up the attack noises.  Sometimes adjusting a tonebar screw (that are often bent) will move a tonebar in a direction out of the way of colliding with a neighbor.

For the core problem I think you're talking about, the noise seems to be when you release an attacked note, and the tine is dampened by the felt.  If you lift and drop the hammer or just pull the damper down and let it go, the tine swing is not part of that equation and therefore doesn't replicate the problem.  So, you're specifically dealing with a tine swing coming to a stop (which is the job of the damper, but definitely a few sound louder than necessary).

Take a look at the actual damper felts themselves on the offending notes.  Make sure there isn't any glue on the top surface or even on the sides, towards the top.  Any hardness in the felt will be heard as that hard surface interacts with a metal tine.  It would be the equivalent of stopping a diving board from vibrating with a pillow or a piece of wood.

If a damper arm doesn't have enough tension in it, it will bounce off the tine repeatedly when you release it rather than stop it on a dime.  That repeated bouncing can make mechanical noise.  Your piano is the hybrid wood hammer version, with single damper arms, so they're a bit more susceptible to "bad bending" when someone tries to bend the damper tips up.  If they're not bent correctly, they may get bent too far down the shaft and reduce arm tension.  It's a little hard to get inside to check, as you need to remove the damper sustain rail under the harp, but check to see if the bad notes look like the damper felt is bouncing around worse than neighboring notes, when you release after a strike.  The frame rate on the video is just fast enough that I can't make it out.

As a note, the black material acting as a shim is a factory method.  Sometimes there is 1-3 shims, sometimes a repair tech later removed it to lower escapement.  Depending on the piano (and your vintage of piano had a lot of factory tech variability), you may want to leave it on there.  Shims usually are on the bass (left) side of the piano - the treble section doesn't have as much of an escapement problem, as the tine swing is much less.
#16
The leg flanges have an angle to the threading.  You want the angle to point towards the corner of the Rhodes, so that when the legs are installed, they flare outwards.

For example, the front left corner flange should have the threading positioned in a way that the leg would point southwest as you're looking at the piano.

The bottom flange in your picture has a leg's threading jammed in it.  You can unscrew the threading, and take the leg and thread to a welding shop to have them spot weld it into place.
#17
When possible, I do prefer cutting with a dremel as it's best to square off the tine at the end.  It does a pretty good job with nice cutters though.  If they're cheaper, I've seen them chip a fragment of the tine off that breaks off farther up the shaft.

The heat generated from the dremel cut won't affect it, but you will need to clamp / grab the tine itself close to the cutting point for longer tines to stabilize them when you cut.
#18
Other Keyboards & Software Synths / Re: Mute Slider
March 22, 2018, 04:17:19 PM
Sometimes the mute about halfway down reduces the brashness of the Clav.  The full-mute position is maybe only for a muted guitar sound, but it really kills all the treble strings.  So I'd agree.
#19
The hammer tips you used - are they the different heights version where they're shorter in the bass than the wood core treble tips, or are they the earlier style at all equal heights?  That would explain eliminating the bass shim and maybe raising the treble shim.  The factory tips on a Mark 2 were graduated in height, and that's how they set the escapement vs. through shims.  All aluminum frame pianos had the exact same height shims from the factory.
#20
A lot of Mark IIs came out with not-that-great strikelines, as the aluminum frame pianos were designed to be assembled as-is.  I was told the harp wasn't hand-located by technicians for the optimal spot like on wooden frame models.

I do find it odd that you had to shim the harp even higher on the treble end.  Before you lock it in, you may want to take another look at the treble placement.  Often when a shim is put in and the piano sounds better, it's because the hammers are now hitting the tines farther back, and actually hitting the optimal spot only because the harp went higher.
#21
I don't believe I have a schematic for the Dyno Tri Stereo Tremolo, but if you search "Dyno my piano schematic" on google, you'll find the standard "pro piano" preamp on the left side of the piano.
#22
Came across an interesting old site regarding a NOS D6 clav in a metal case, apparently a letter from Hohner Canada:

"This is a rare version of the Clavinet... The original Clavinet D6 was Hohner Model Number HK205. This version of the Clavinet is Hohner Model Number HK215 and is know as the D6-N... It is apparently a D6 Clav in an E7 Case... Some short time later, the updated E7 was introduced...

This information came to me in the form of a letter dated 23 October 1979 from G. W. Wilson, General Manager of Hohner Canada Inc. when I inquired about the D6-N we received instead of the D6 we ordered...

As well, in the letter, Wilson states that the original D6 was discontinued earlier in 1979 with 'N' (for 'new') being it's replacement... What I personally REALLY believed happened was that the E7 was developed and ready to ship in 1979. The factory ran out of D6 cases, BUT still had some D6 chassis to sell. So, the remaining D6's put into E7 cabinets until the D6's were sold out... Then the E7 was rolled out... Some Clavinet experts are not even aware of the D6-N's existence..."

http://www.mesonline.com/keyboards/details_hohner_clavd6n.html#image12
#23
WOW.  Fantastic.  Are there varying shades of whiteness across the keys or did they come out pretty uniform?  Hard to tell via pictures, but curious if they all whitened exactly the same or only minor shade differences between keys
#24
Haha wow, an almost decade-old post!  As for me, I've gone the pedal route for a touch of basic reverb when needed.

Here's a much better approach with VV and a well-integrated unit:
https://www.vintagevibe.com/blogs/news/1971-fender-rhodes-suitcase-with-stereo-spring-reverb

#25
1974 - In 74, the stamps often get wiped away or disappear.  Other indicators:

Non-skirted keycaps on an 88 means it's not a 1973 or earlier
Fender Rhodes gold foil badge means it's not an early 1975
40k Serial number often falls somewhere in the '74 range

You might be able to look for a very faint outline of a blue ink date stamp, in the top right corner of the wood harp.  Try a couple different lights, looking from the side, low/higher brightness etc. and you might see a 74.
#26
Preamps, Modifications & Upgrades / Re: Miracle Mod Issue
February 13, 2018, 11:45:20 AM
Thanks for being thorough with the pics and description.  The action rail (the aluminum extrusion where all the hammers are screwed into) is slightly misaligned with the key bed.  This can happen on your era of piano, because it didn't have a factory bump, and there was more room for error when assembling and attaching without any noticeable quality control problems.  The hanmmer rolled over the key pedestal just fine in both high and low sections.

The highly involved and correct way to rectify this would be to reposition the action rail and harp supports as they're attached to the key bed.  Basically, rotating the entire left of the action rail back slightly, so your low hammers intersect the key pedestals further back.  However, there's a lot involved with this small adjustment, including redoing the harp's strikeline as its attached to the action rail / supports.

Unless you're down for removing the piano from the case, getting it up on a stand and taking a look at how the aluminum frame is attached to the key bed, and seeing how to adjust it, you may want to take a look at methods like pnoboy is suggesting or other fixes.  The bass section is where the escapement matters most, so you could be running into double-striking in the low section, and definitely a difference in feel across the piano if you did a bump mod as-is.  I wouldn't recommend doing bumps on some and not others - the feel difference would be dramatic.

You might be able to get away with starting on the lowest E at the very edge of the key pedestal, and matching that position all the way up, so your high E is also further back, to match the low E.  Then, when all your hammers match that, you can globally set escapement by raising the harp etc.
#27
A word of warning as well about using abrasives on metal parts while still on the harp - being that the pickups are magnetic, they have a good chance of grabbing onto metal fragments both in front and behind the pickup coil.

I just went through a Rhodes with a neodymium magnet, and it pulled off a palm-full of steel wool and fragments. 
#28
Hysterical.

If the screw head strips off, or if you don't have a vise handy, a decently long adjustable wrench can be fit over the tine block (because it's square), and a big pair of crescent tongue and groove pliers to grip onto the tonebar (with a towel etc. to prevent marring the finish).  You basically twist the tine block and tonebar against each other to loosen the screw.
#29
Very interesting.  Perhaps the fiesta red models from the catalog were these from 1963?
#30
I recently used 1 piece for a factory C retolexing, and I can tell you it's a beast.  I had to very carefully cut a perfectly straight line on the back corners from top to bottom, to get the tolex pieces to marry right next to each other.  It looks great but there was no turning back if I slipped up.
#31
Good suggestions by Sean, and am I correct that the distortion started before you rebuilt the preamp?

It's very hard in these amp systems to nail it down to the preamp, power amp, or amp modules because they're so interconnected. 

Does the vibrato work, and at slow speed / full intensity, does the distortion happen on both amp channels?  This would help rule out the amp modules which usually need a rebuild, but rarely fail together.  it's also good to check that both channels are in fact working.  Headphones help to hear things clearly.

If the distortion is present on both channels, and you've had a preexisting buzz before the distortion, it could either be the preamp or the main power amplifier.
#32
Sean's spot on about date!

The hammers may or may not be missing - sometimes they get hung up on the side of the tines if the harp shifted at all.  Or, if the key bushings are very swollen, the keys themselves will stick down and hold the hammers up and just out of the sight of this picture... so it's hard to exactly tell but you might be ok?

The biggest surprise is that you've got a Dyno My Piano cheek block (toggle switch), which leads me to believe this is a stage model that was modded by Chuck Monte at one point in time.  However, the dyno preamp is gone and therefore the cheek block serves no purpose any more, as it was to only power the preamp.  The 9V battery cable (black one inside) is still there because it's tied into the cheek block.  It looks like someone was trying to splice a cable directly off of the harp because that preamp has gone missing and there's no way to get signal off of the Rhodes except from the harp. 

During this era, Fender was pre-drilling the name rail holes, so it may look like it was a suitcase rail but with the faceplate off, you can't tell if it went to a suitcase or stage piano because the "Mark 1" faceplate covered the holes - and the 3 suitcase knob slots were filled with the output jack and tone controls for the stage.  It's hard for me to see the length of the front lip from the pic angle, like Sean is talking about, where stage pianos have a thicker case than suitcases.  The big indicator is when you look under the piano, and see either 4 large leg flanges or holes where the legs would go.  Chuck worked on stage models 9/10 times because the stage models had no preamps and it made the biggest improvement.  People that had him mod their suitcase pianos seemed to be the bigger industry session players, but you never know!

So, the good news is that it's a great vintage of piano, and Chuck may have done some mechanical tweaking to it... but definitely will need service.


#33
It might be near impossible to sand it back down to wood, especially in the corners / leg compartment.  I would think either lightly sand it down and redo a nice black finish inside, or look at chemical strippers to get into the crevices.  Only problem is, you don't know what's underneath and why someone went through the trouble to paint the insides black?  Glue residue, scratches, water damage... not sure if it was just cosmetic only?
#34
Think of transistors like an electronics-activated switch, and you don't want to have a malfunctioning switch.  The bag is labeled with "EBC" which stands for emitter, base and collector.  You'll want to make sure you place them with the legs in the correct spots, as labeled here the order of the collector and base legs are different from the original component (ECB instead of EBC)

You may want to look up a basic explanation of transistors online, how to test them with a multimeter etc. or take it to any electronics repair shop with the schematic and ask them to replace the transistors.
#35
Parts, Service, Maintenance & Repairs / Re: Sagging PCB
December 12, 2017, 01:45:51 PM
If flexing the board makes the distortion go away, it's very possible there's a cold solder joint on a component.  When flexing it back, everything makes contact.

If you're experienced with a soldering iron, you may want to flip the board over and reflow solder to the sagged area.
#36
If the reed was in tune before, and it's dropped suddenly flat, then it almost definitely has a hairline crack or is ready to break.  If you want to make it through the gig, I would be careful jamming hard on that note.  If the reed breaks, it has the chance of landing on the pickup and creating a real fireworks show of crackles and pops as you play.  Or it could just fall and go dead.
#37
Great idea!  There are definitely some anomalies out there.  Like you mention about the black D6... when I show up with a D-6 but it's "in the black and metal E-7 shell," people are highly confused and don't think it's factory.

#38
These pickups appear to be the dark red color - a late 79 transition period before they started wrapping them in white tape, but they're the same faulty design.  They have the same deficiency of corroding at the terminals as those wrapped in white tape.  I had a late '79 piano with dark red wire pickups and clear tape, and had to replace a score of pickups.

Any 54-key model is in the Mark II period, but to confirm - if the TBJ number by your serial stamp is 017281-TBJ for the 54-key model, then it's the later, faulty pickup design. 

When you replace a dead pickup and the piano works but then dies again... the 54 is wired in series as mentioned above, they're like old christmas lights - one goes out and that's it.  If the piano is seeing a lot of use as of recently, the bad pickups might start showing up.  It can be a sad state of affairs for this generation if moisture or corrosion is present, but at least you've only got 54 and not 88 :) You might end up replacing anywhere from a handful to 20 or so pickups
#39
+1 - the front rail pins are oval in shape specifically to help with gaps.  In the future when the pins can no longer help with side-to-side movement reduction, that's when you can replace the front bushings.  The balance rail pins however are not oval, so if you see a lot of wiggle side-to-side on those, the felts would need to be replaced.
#40
That piano was a beast of a restoration!  Glad to hear.
#41
Quote from: Tim Hodges on November 22, 2017, 04:55:21 AM

Nerd!!!  ;D

But I concur

Brilliant  ;D   
+1 on that angle cut Ray
#42
In the spirit of geeking out, when she depresses a white key, I see a full skirt keycap and not wood, so it might place it to around 1973 as well as those early hinges.
#43
Hey Evan, thanks for checking out the webisode.  That piano is a highly customized, ultimate Rhodes piano (if you will) that I built.

I have a one-off preamp in there that has a brighter treble response and more robust bass, with very low noise, that isn't achieved with a normal Rhodes preamp.  As well, it's a piano top from 1974 that has an early Rhodes sound, paired with a late 70s 5-pin power amp cabinet for higher output and stability. 

It may be difficult to get this exact sound from a 1977 stage because I spent a great deal of time and money building it, however there's a lot you can do to improve your sound.  First, the most important stage of the Rhodes sound in my opinion is the preamp.  With a passive stage piano, like a passive electric guitar (not powered), your sound is shaped directly by the amp you're using - a Fender Twin, a Roland JC-120, or whatever type of other guitar or keyboard amplifier you're using.  You may want to explore the specific Rhodes preamps out there that are designed for the instrument - Vintage Vibe's Stereo Vibe Preamp, or an original Fender Rhodes "Peterson" preamp are the standards.

You may also want to look into a 10-band EQ pedal, for example by MXR, that allows you to custom select different bands of EQ to amplify.  I will admit that these EQ pedals do introduce a little bit of hiss and general noise, but that can sometimes be overlooked by a better dialed-in tone.

Wish I could help with achieving the Frank tone from our clip, but it would be a very heavy investment coming from a couple decades of experience dialing in the best of Rhodes production and further customization.
#44
This is totally magnificent.  The lunchbox is brilliant :)
#45
The very end of 1969 in regards to date stamps is when the first black lid pianos came out.  I'm sure they were intended to hit the showroom floor by 1970, but physically the harps were produced in 69.  Here's an example, though the photo links are broken you can click on the album link.

http://ep-forum.com/smf/index.php?topic=8758.msg47080#msg47080

The super satellite system did not come out initially in 1970 in tandem with the stage model.  I believe it was developed later as an amp system add-on.  Could've been around 1972/1973-ish as a wild guess.

I can confirm that yes the Mark II date stamps begin in 1979... probably a similar pattern to have them hit the showroom floor by 1980 but production began before that.

#46
I might suggest setting the tone and pickups with a set of headphones, if you happen to have a practice amp or other device to amplify sound through headphones.  Depending on the speakers, you may naturally have high end drop off, so it sounds to your ear different than what comes directly off the preamp. 

Otherwise, you might consider setting your high end tone and pickup distance first, then working down the piano.  This way might help you balance things out a bit more.  The top section definitely won't have a substantial bark by design, compared to the low or mid section, specifically because the distance the tine swings when struck is much less.

Maybe post an audio sample for us on soundcloud
#48
+1 for the pickups.  They may need to be even closer that you'd imagine.  On a Mark II, I can get a really strong bark when requested, but the pickups are really close.  Experiment with a couple in the mid range that are much closer.  The only drawback is that the distance is a very small adjustment to get them all even (exponentially louder the closer you get).
#49
Welcome! 

YouTube has a large number of great videos for DIY repairs.  As you get into the piano, searching this forum will yield a lot of information on how to do certain fixes.  Have fun with it!
#50
Hard to separate just Rhodes in popular recordings, but one of our webisodes demonstrates:

https://www.youtube.com/watch?v=3bIoAddTW80&t=21s
Ronnie Foster has the vibrato at slowest setting at 1:10, and you can see the vibrato knob set to lowest.