News:

Shipping now! "Classic Keys" book, a celebration of vintage keyboards  More...

Main Menu
Menu

Show posts

This section allows you to view all posts made by this member. Note that you can only see posts made in areas you currently have access to.

Show posts Menu

Messages - sean

#801
For in-home use, or even in-studio use, you would probably really like a second-hand Fender Princeton Chorus:


The benefits:
It looks like a Fender blackface amp.  (Don't get the red knobs.)
There is enough gain for the Rhodes while still playing clean.
It has a master volume, so you can play quiet.
The built-in chorus is disturbingly satisfying.  It sounds good and wet.
There are guzintas and guzoutas for effects loops.
It is almost small enough to tuck under your piano.
It is light enough to carry around.
It has reverb (Hammond/Accutronics, not DSP!).
The chorus and overdrive are footswitched.
There are models with one 12" speaker, and models with two 10" speakers.  Either one will be fine.
It is really CHEAP on ebay and craigslist.  Never pay above $200. (You may have to pass on a few to follow this rule, but lots of them sell for less than $200.)


The ONLY bad part is that it is not a huge powerful amp that can hold its own against a drummer and guitar in a rock gig.  It can't get super loud.  Oh well.

It isn't loud, but it sounds good enough to make the Rhodes sound like a Rhodes (crank the treble to 7, and lay back on the bass and midrange, I mean mud and mudrange).  I have not yearned for a different amp [clearly, I don't gig -  Maybe it could sneak through a gig by using the effects loops to send to the PA].


Three more rules:
2.  Get the transistor version, not the tube version.  You can tell immediately by the price:  tube version costs above $1000, transistor version costs less than $200.  (The tube versions are called Princeton, or Princeton Reverb, but not Princeton Chorus.)  (There is a sweet Princeton Recording out there too.)

3.  Get the version without the red knobs.  (I have never touched, played, nor heard the version with the red knobs, but I am prejudiced against the way it looks.  yuck.)

4. Don't buy it if it has DSP in the name.  Never buy an amp that has DSP in the name.  (Another personal prejudice, sorry.)


Sean
#802
The screws holding the three corners of my Wurly 200 leg mounts are 3/4" #10 all thread flat-head wood screws.

They look short and stubby, and they don't seem to have a lot of holding power in that thin piano bottom.
#803
They probably were one-inch-long #12 all-thread round head (or pan head or cheese head) phillips-drive screws (cheap zinc-plated steel, not stainless).

This is what I had in my 1973.

If you don't have a local awesome Tru-Value or ACE hardware or other mom-and-pop hardware, then you can go to the mammoth home center near you, and easily find a workable replacement screw in the plastic baggies:

The one-inch #12 sheet-metal screws will work fine, and you can get them in stainless steel if you have a few extra coins.
#804
Duuudes!

You really need four amps to hear the Rhodes in Quadraphonic!


The real Rhodes will sound delicious in mono.  (And if you run it through a good stereo effect, the real Rhodes will sound delicious in stereo.)


For me, I go crazy for the sound of a leslie working with an organ.  That is the only stereo effect that floats my boat.  But when I try any of the stereo modulation effects on my Rhodes, it doesn't get me nearly as excited.

I feel that I may be missing something in life.  I have no taste for fine wine, and no taste for good stereo effects on Rhodes or Guitar.
#805
The Wurlitzer Electric Piano / Wurli 200A
April 12, 2009, 11:54:06 AM
Hey Matt,

Have you already fiddled with the mounting of the speakers, and found that everything is tight?  Which speaker mounting does your 200A have: mounted on the top lid, or mounted just behind the lid on the piano itself?  Maybe you need to make yourself new gaskets around the speakers.

Do you have the screws that would have mounted the music rack turned nice and snug?  

Is the volume pot mounted snugly as well?

Does it still buzz if you remove the music rack screws, and remove the knobs, and let the top sit loose?  Does it stop buzzing if you torque the top by lifting the right of left cheek a tiny bit?

If it is a wire rubbing against the top, then you might have to hold down the wires inside with a little tab of electrical tape.  


Does it buzz when you play a Barry Manilow medley?  Then DON'T PLAY A BARRY MANILOW MEDLEY!
#806
Quote from: "multmin"
Quote from: "sean"Oh crud.  I am getting old.

I don't remember removing any screws to free the top from my Mark V, hmmm....

I am guessing you were either being kind...or kindly sarcastic.


Well, I was really just being kindly absent-minded.  I have since found the two screws and clamp parts in a jar marked "Mark V parts."  I think they were already loose when I got my Mark V, but the top cover does show some minor scars where they were (at some time long ago) holding the cover down.  

Thanks for the photos and explanation, Ben!  I guess I should re-install the clamps someday.
#807
Hey TM,

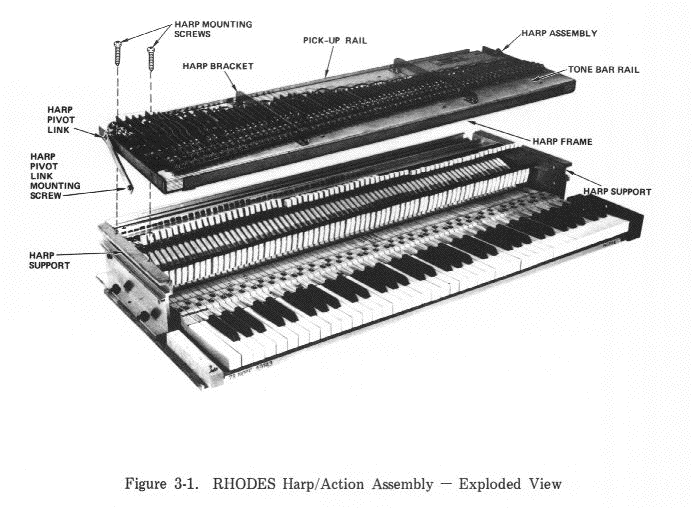
I assume you have a late seventies Mark I that has the aluminum harp supports (with stripped holes), and missing the harp pivot links shown here:  http://www.fenderrhodes.com/org/manual/fig3-1.gif


The harp pivot link is a simple bar of steel 3/4" wide, 1/8" thick, and six inches long.  The holes are 5.250" apart (3/8" from each end).  (Go buy a "mending plate" at Ye Olde Hardware Shoppe, and hacksaw it to six inches long.)

The link attaches to the harp with a 3/4" #10-32tpi screw, a few washers, and a nut with a nylon insert to keep it from rattling loose.

The bottom of the link is fixed to the harp support with a #10-32tpi screw that is 7/16" long, and has a flanged hex head.  It looks like the screw at this link, but doesn't have the phillips drive:  http://upload.wikimedia.org/wikipedia/commons/thumb/7/7b/Cross_slot_screw.jpg/600px-Cross_slot_screw.jpg

Oh where have I seen that screw before?  It is the same screw that holds the tine to the tonebar.

This "harp pivot link mounting screw" fits into the groove molded into the side of the harp support.  It is easy to insert with the action removed from the piano case, good luck otherwise.  
==  ==  ==  ==  ==  ==  ==  ==  ==  ==  ==  ==  

The screws that secure the harp to the supports are 7/8" long #12-24tpi pan head screws with a phillips drive.  The factory-installed originals were the self-tapping (AKA self-stripping) type, but there is no need to replace them with a self-tapping screw.  

If your holes are stripped, you might carefully drill them out to a slightly larger size, and tap them to 1/4"-20tpi.  However, the aluminum is soft enough and thin enough that the threads are easily damaged. (You already know that.)  

You might simply buy a few #12-24tpi nuts and modify them to fit in the tight space in the harp support.  (You also already know what a pain it is to get a nut on the end of the screw in this tight space, and you would probably have to file off one side of the nut.)

Good-quality bolts with a smaller diameter might give you the clearance you need to get a nut on the bottom.  I bet #8-32 stainless-steel screws would be strong enough (unless you really want your harp to survive a six-foot drop).
#808
There is definitely some variance in each piano, especially after the wood ages for 20 years.  However, the pins themselves should never be bent.  Sometimes they seem to stick out of the hole at a curious angle, but the metal pin itself should be dead straight.  If they are not straight, then they were installed poorly, or they were carelessly "adjusted" to prevent keys from rubbing.  (Bending the pin is not as smart as sanding down the side of the key.)

I would LEAVE THEM AS THEY ARE unless they are causing keys to rub or sit cockeyed.  If the piano plays fine with the slightly non-uniform pins, you should leave them be, close up the piano, and pretend you don't know that they are less than perfect.

If you try to straighten them out while they are still inserted in the balance rail, you risk deforming the hole in the wood.  Yes, it is hard maple, but it is still softer than steel.  The pins are not soft.  If the maple balance rail shows any signs of water damage or any cracks, you should try to pull the pins before you try to bend them.

If you use a hammer to tap on these pins, I guarantee that you will deform the mounting hole in the balance rail.  You might not ruin it, but you should be careful.  Multiple repeated small taps is better than fewer hard bangs.  (Multiple small whacks with a hammer will heat the metal significantly, and it will soften, and it will gently bend.  This is a classic steel forming technique.  Try this on a 1/4-20 bolt.)


Now, truthfully, the pins don't really have to be super-tightly mounted in the balance rail (and some of them will pull out if you can get a good grip on them).  If you damage the mounting hole, you can get the balance rail pin to stay put with the old toothpick and glue trick.


If I had a beloved Rhodes piano with a few bent pins that were causing problems with my playing enjoyment, I would wrap the pin in thick leather and remove it with pliers, then straighten the pin on the workbench, then re-insert the pin into the balance rail.  And if I screwed that process up, I would buy fresh new pins and install them.
#809
Oh crud.  I am getting old.

I don't remember removing any screws to free the top from my Mark V, hmmm....

When I get home tonight, I will have to take another look at it.
#810
The fact that the D key is depressed indicates that the hammer is broken or missing.

It makes no sound when plugged in, so it probably has a bunch of dead pickups.  

No photos of the insides, so nobody knows what else is wrong.  Maybe nice and clean.  Maybe.  The seller has sold tons of audio gear and musical gear, so I am very curious why there are no photos of the insides.

What are the markings or scratches or cracks on the keytops?  Faded magic marker?  I dunno.

So, I only bid $150 on it.
#811
Re-plating, spray painting, or even a little bondo on the tone bars will not affect the sound.

You can prove this to yourself by sticking a hunk of bubble gum or whatever to a few tonebars.  Play a little, and you won't notice a difference in tone (and I can't detect a change in sustain either).

You can sandblast the tonebars, sand them down, acid wash them, or just leave them the way they are.

If they don't look too bad, the best idea I have heard is to simply spray them with clear Krylon acrylic or polyurethane spray.  I guess you could also choose silver, blue, and gold.

If you have a gear fetish (duh, we all do), or a metal fetish, then re-plating is the way to go.  It is probably about the same cost as finding a new set on ebay, but I would love to have shiny chrome or nickel tonebars.  For some reason, I also like the idea of copper plated tonebars (gold plated tone bars just wouldn't look right... well, maybe).

If you know the folks that do re-plating work, I think you should give them the tonebar mounting springs to dip in the copper bath as well.  (Chrome plating is still done in layers, right?  Don't they do a layer of copper and then a layer of nickel, and then the final coating of chrome?)

The springs might not be the best substrate for plating, but it would probably work well enough, and it would look "totally wicked," i.e., "cool."

(Truthfully, I must admit that I am too lazy to do all this.  I would probably just try to snag another Rhodes and swap out the harp.)
#812
I have a damaged keybed that had a tragic past, and had rusty balance rail pins and rusty guide rail pins, and I was determined to see if I could bring it back to life, so...  

Since the pins are already rusted, and the nickel plating is already trashed, I didn't feel like I had to be gentle about removing the rust.

I took some sandpaper and re-inforced it with packing/strapping adhesive tape (glass fibre reinforced tape), then I cut the sandpaper into 1/2" to 3/4" wide strips.  I used 120-grit, 220-grit, 400-grit, and 600-grit sandpaper.

I then sat down and tried to polish all the pins using the "shoe-shine method."

What a pain in the... pain in the... well, what a mess.

In a few minutes, I raised a good cloud of rust dust, and made a mess of the work area and the keybed.  After about an hour of work, I had about four or five nice clean smooth pins.  I lowered my standards, and continued to work.

It took a few days of intermittent work, but eventually I got the pins mostly-clean, and decided to give up.  I then had to vacuum and wipe the whole area and keybed clean repeatedly.  I wiped the pins clean with silicone oil (hoping that would prevent future rust).

The finished job looks nothing like new, and is not anything to be proud of, but it is functional.  There are visible scratches on most of the pins, but no noticable binding against the felt key bushings.

--------   Don't use a Dremel:    --------
I did try using a dremel tool on a few of the pins, but I quickly determined that the dremel is too aggressive.  The dremel can make significant gouges, pits, and grooves in the pins.  The high-speed rotating action and tight spacing of the pins make it easy to bonk into the wrong surfaces.
#813
Take a look at the photo in this post:
http://ep-forum.com/smf/index.php?topic=4650&;

The white wire is the "hot" wire that should go to the "tip" connection on the 1/4" jack.  

The black wire is the audio ground, and should be connected to the "sleeve" connection of the 1/4" jack.

Tip-ring-sleeve explanation for 1/4" jacks:  http://en.wikipedia.org/wiki/TRS_connector
#814
Also the left side logo which jumps to right side logo was a common feature of RMI pianos....

okay just kidding...

The video seems to be flipped in the very beginning and again at the end.

Since Nigel Olsson is a right-handed drummer, I believe the video is in the original format when the RMI label is to the right side of your computer screen.  (So Nigel's right hand is crossing over to the hi-hat on the right side of your computer screen.)
#815
I think it is an RMI of some sort.
The endblocks (like cheekblocks) look like the RMI photos at:

http://www.hollowsun.com/vintage/rmi/index.html  and
http://www.synthmuseum.com/rmi/rmiele30001.html

The rectangular logo label looks similar too.  

...at about 1:29 in the video you can see the clearly-RMI profile.  

So is some sort of RMI Electra Piano...
#816
When I say "pipe clamp," I mean this thing:


I actually use a much-wimpier-but-similar clamp.

Also, since your insert is already loose, there is no reason not to pull the insert all the way out and take a look at it.  This way you can inspect how much of a flange it has to accept your screw (or rivet).  This will also give you a chance to scrape the gunk off the end of the tube (and the insert) to make sure they mate perfectly.  The insert goes back into the tube pretty easily (with the encouragment of a rubber mallet).
#817
I think the early legs were indeed welded, but in the mid-to-late 1970s they went to the force-fit half-assed crimp job to attempt to hold the threaded leg insert in place.

I have seen many ugly weld repairs to the legs, and I agree with Stef that it can make the problem worse (well, it fixes the problem, but it can get ugly).  The welder is rarely asked to properly grind down and polish the lumps of steel at the new joint, and the jagged edge scratches the other legs and braces when they are thrown together after a gig or in storage.  If the insert is not properly clamped in place (forced flush with the end of the tube), then the weld will create an off-angle joint, and the leg won't screw in straight anymore.

My preferred repair is simple:  Drill a 1/8" (or 2mm) hole near the top edge of the leg tube into the insert, and then drive a rivet or screw through the hole to prevent the insert from rotating.  (A steel pop-rivet works great;  a pan-head screw works great.)  

The protruding rivet or screw head is barely noticable (and less abrasive than a sloppy weld so your other legs don't get scratched).

I put the leg in a vise, and then use a pipe clamp to hold the threaded insert good and tight into the end of the leg.  Then I drill the hole and install the rivet (or screw) before removing the clamp.    (You don't need to drill all the way through the leg, just one wall of the tube.)

This repair takes five or ten minutes.


(Oh, I have also seen lots of sloppy welds covered with duct tape, bicycle grip tape, and even epoxy to try to smooth them over to lessen the scratches on the other legs in the bag.)

Sean
#818
Well, I unwrapped two pickups, one from a 1981 white-tape-wrapped lot, and another from a 1973 clear-tape lot.

Both wires measure ~0.0045 inches in diameter, measured with a dial caliper that is is of reasonable accuracy.  

So, my guess is that it was 38 AWG enamelled wire, supposedly .004" in diameter.

36 AWG would be .005" in diameter, and will probably work fine.

I wouldn't really want to use anything smaller (too delicate).  My guess is that it is less than 2500 windings, but I will let somebody else count that.
#819
You will have better luck searching for "stranded bare wire."  If you are looking for the wire that jumps from pickup to pickup, you would probably want it "tinned."   "Stranded" just means that it is made up of multiple strands; "tinned" means that it was dipped in solder (that may or may not have any actual tin (Sn) content) so it looks silver in color and will not corrode or unravel.


If you are looking for the tiny enamel-coated wire that wraps around each pickup, then you would probably want something thinner than 24 gauge, and thicker than 40-gauge.

We used to call this "motor wire" or "bell wire" but now it seems folks are calling it "magnet wire" or "tattoo wire."  

See ebay item 160316895598 (24 AWG green)
See ebay item 290297110003  (42 AWG, probably too thin)

I dunno what thickness wire was used on the Rhodes pickups, and I can't find any info posted, so give me a few minutes, and I will go downstairs and measure some pickup wires and guess what gauge they were made from.
#820
Hey Lou,

You should definitely get yourself a cheapie volt-ohm-multimeter.  Harbor Freight tools has them on sale for $3.99 almost all the time.  Holy Buckets Batman, they are on sale for the price of a 9-volt battery!!   http://www.harborfreight.com/cpi/ctaf/displayitem.taf?Itemnumber=90899


More importantly, get yourself some solder wick.
http://en.wikipedia.org/wiki/Solder_wick

Use the solder wick to suck up the solder from the joint you are repairing.  You can push the pickup rail jumper wire off the pickup connection without cutting it.    When you install the new pickup, don't bother to hog-tie it like the original jumper wire was installed.

That's the drawing from halfway down the page here:
http://www.fenderrhodes.com/service/pickups.php

Be gentle and careful when soldering pickups.  The nylon bobbin gets nice and soft when heated.  When you heat the pickup terminals, they try to fall out of the bobbin.  (Not so important when you are removing a dead pickup, but make sure you work fast when you are soldering the new pickup in place.

Theoretically, you can repair or rewind your pickups yourself (if you have time, and lots of it).  http://www.fenderrhodes.com/service/rewinding-pickups.php


(BTW, do yourself a favor and practice your soldering on something other than your Rhodes before you work on your Rhodes.)
#821
You will not break anything.  It isn't difficult or mysterious at all.

The operation of the two screws is shown here:
http://www.fenderrhodes.com/org/manual/fig4-4.gif
(Relevant text from the service manual is http://www.fenderrhodes.com/org/manual/ch4.html#4-1 )

Of the two screws that hold the tonebar, the screw nearest the keycaps is used to adjust the whole assembly up-and-down, so this is the gross adjustment for escapement.  The other screw (toward the back of the piano), is used for fine adjustments of the position of the tine relative to the pickup.  

I guess you could damage things if you cranked the screws really tight, but why would you do that?  You can completely loosen them, and the tonebar will come loose in your hands.  Simply screw them back in carefully.  Hardly a risky procedure.

Loosen the screw closest to the namerail, and that will increase the escapement (and also mis-align the tip of the tine with regard to the pickup).  When you adjust the "escapement screw" you have to re-position the tine with the "timbre adjustment" screw.

Set the tine position according to your preference for the sound produced, with this general guide:
http://www.fenderrhodes.com/service/tine-settings.php
#822
Don't disconnect the bridle straps!

First, read this:
http://www.fenderrhodes.com/service/dampers.php

Then, read this:
http://www.fenderrhodes.com/org/manual/ch4.html#4-4

Then, read them both again.   ...and again.   ...and again.
________________________________________________________

Your damper release bar should indeed have a strip of thick black felt along the whole length.  The strip should be flush with the front edge of the bar (not a continuation of the short felt on the edge of the cutout portion for the bass notes).  Only the felt should contact the damper arms.

After you replace this felt (it might still be inside the piano, laying loose), your dampers will probably be greatly improved.  But, no doubt, they will not be perfect.

Pull off the piano top cover and set it aside in a safe place, then pencil mark the exact location of the harp where it sits on the harp support shims, then you can remove the screws that secure the harp.  (You will lift the harp out of your way to make adjustments to the damper arms.)

Play the piano with the top removed so that you can study the behavior of your dampers.  Look closely for dampers that don't move exactly like their neighbors.  

Lift the harp, and prop it up securely.  Take a deep breath, and bend the errant damper arm ONLY AT THE PLACES THAT THE SERVICE MANUAL ALLOWS YOU TO BEND THEM.  Violation of this rule is punished with an extended time required for this frustrating damper adjustment chore, increased frustration, and sucky damper performance.

Go for tiny adjustments at a time, don't make drastic changes.  Be gentle, and don't yank on the bridle straps.

You will have to lower the harp back into position to test each damper as you go.  

If you notice that a previous owner has bent the dampers in an inappropriate manner, curse them.  Gently repair their bad bends.

After you adjust one or two dampers, I really truly suggest reading the service manual and Steve's technote just one more time.
#823
Hey Jordy,

It sounds to me like you have a combination of hard hammer tips and really low escapement on those notes.   Try raising the whole tonebar/tine assembly up 1/8" or more, and see if the clack goes away.

If the clack becomes less annoying, then simply adjust the screws back down gradually to get the tone you want.

Drastic changes in escapement will cause a change in the location that the hammer tip hits the tine.  (The clacky noise could be helped by a strike point too close to the base of the tine, but the surrounding notes don't seem to suffer from that, so I wouldn't worry about a strikeline problem.)  Use strikeline as a final-stages-of-perfection adjustment.

While you are focused on these notes, take a few moments to confirm that the hammers themselves are securely mounted to the action rail, and the hammer comb is not loose.

Also, your 1971 piano has the head-heavy half-wood hammers with tall square neoprene tips, right?  This makes tip replacement more difficult (harder to find the tall square tips, or you have to re-set the harp shims to compensate for the smaller trapezoidal/pointed replacement tips).

If those few tips are remarkably hardened, you can try removing a sliver off the top of the tip with an exacto knife (be prepared to cut your finger and drip a little blood on the piano).  The chewy center of the hammer tip might be soft enough to fix your problem.
#825
Hold on a second everybody!!!

Did he say he wants to cut out the BRIGHT?  He has a Rhodes Stage Piano that is too bright?  

Isn't this a whole community of folks who have the treble control on their amp cranked up to 7 (we would go higher, but who can stand the hiss?)?


Shouldn't we all be begging him for his pickup rail mojo?  How does he have a Rhodes that is too bright?  I want that.

[take a few deep breaths into a paper bag]


Hmmm...  maybe it isn't so much an EQ issue as a pickup-balance issue:  Is your main problem not really the brightness of some individual notes, but the fact that the notes in the upper octaves sound so LOUD on your Rhodes in comparison to other notes?  It may not be all the upper octaves, it might just be a small range of notes.

If that is so, you might need to spend a little time adjusting the pickups so that the notes play with a pleasing relative volume in relation to each other.  

See the service manual for how-to:
http://www.fenderrhodes.com/org/manual/ch4.html#4-7


If you need instant gratification, you might find it in a compressor.  I have an old cheapie that works fine (MXR Dyna Comp), so I assume that most compressors sold for guitars would work fine.  It would be worth borrowing one from a friend for an evening of experimentation.  The compressed Rhodes signal will eliminate the too-loud notes (it will rob you of some of your dynamic expressiveness, but it won't kill you).  


Sean
#826
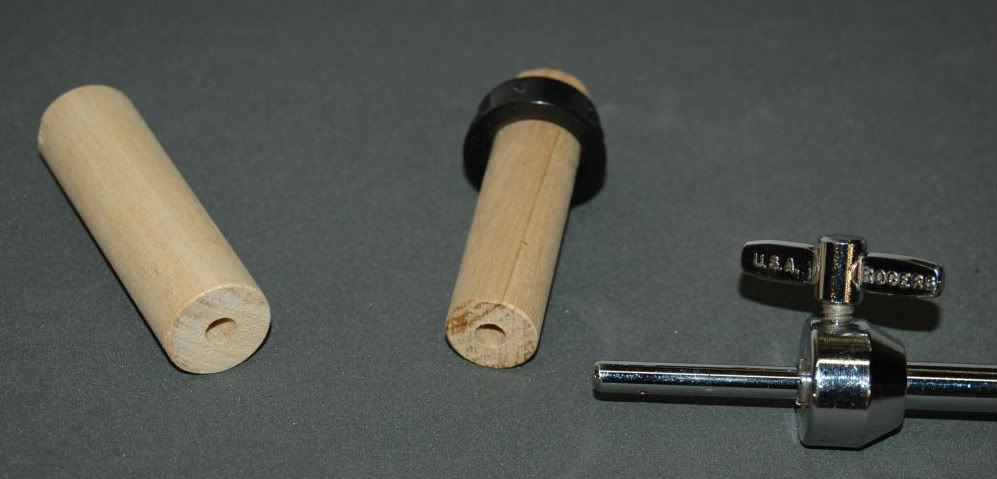
If you have a suitcase piano top, or a piano that doesn't have the sustain guide cup or a dimple in the damper pushrod (the wooden dowel that the sustain pedal rod pushes on), you can use the sophisticated solution shown in the picture below:


If your Suitcase piano is missing the plastic grommet in the hole where the pushrod goes, you can use a 7/8" wooden dowel.  If the glue is still holding that grommet in place, you should use a 3/4" dowel.

Make the dowel three inches long, and drill a 1/4" hole two inches deep in one end.  It will slip onto your sustain rod without much fuss, and it will stay there securely... maybe too securely.


You should know that this brilliant design should be considered "PAAF" - "Patent Almost Applied For."  You can make this little part out of any cheap little pine or poplar available at your local hardware store, but you get much better tone and sustain if you make it with lumber cut from the heartwood from a Norfolk Island Pine overlooking the white pointers on Manly Beach.
#827
Oh no.  Jon!  Now you have added another project to my list!!!

I have largely left my top octaves alone, because
 -  I play them almost never,  
 -  I don't like to mess with the fine balance between stuck hammers, clicking or whacked dampers, and lucky escapement settings, and
 -  I am generally lazy.


Now I want to experiment with them, and figure out:

1.  how much variation in tone can I get with the two-screw setup,
2.  how much sustain can I get with the two-screw setup,
3.  what is really the ideal spring combination for these notes, and
4.  which are better: loose-fitting grommets, or tight grommets,
5.  which are better: soft grommets or harder grommets,
6.  how does that compare with the one-screw rubber standoff setup?

And I have also always wondered about this:
7.  Would felt grommets or a felt standoff do better than the rubber grommets or rubber standoff?  (I swear I saw a Rhodes on ebay with a felt standoff.  I thought I snagged the picture, but I can't find it now.)

There is also one option that the two-screw setup will allow:
8.  I have heard of one professional tech that likes to custom-make extra-tall wood hammer tips, and then set the top octave tonebars a bit higher off the harp.  This extra distance compresses the springs less than normal, and he claims this looser grip gives better sustain.  I have always had a tiny desire to test this out.


All of this would be a useful exercise, and I think it would provide interesting results, but... Hmmm... maybe if it rains a lot in June....

Sean
#828
Dear Alex,

Don't do it.   That rubber standoff isn't that bad a solution, and you really don't need the precise control of tine position in that octave.

If you have one tine/tonebar that just refuses to sit in the right place, and won't sit tight, you can use paper or felt shims to make it behave.  

The single-screw mounting of those tiny tonebars is designed to give you better sustain.


You might be able to demonstrate the slight decrease in sustain that the second screw, spring, and grommet would create by holding the back of the tonebar with your needle-nose pliers.

Sean
#829
Parts, Service, Maintenance & Repairs / Rail Post Lube
January 25, 2009, 11:13:37 AM
Most recent chatter was under "Guide Pin Lube"

http://ep-forum.com/smf/index.php?topic=4902&highlight=guide+pin+lube
#830
Amps, Effects & Recording Techniques / Low Budget....
January 25, 2009, 09:21:39 AM
You might learn to hate the Frontman 25R for being noisy.  

As Ray Davies said, "Cheap is small and not too steep, but best of all cheap is cheap!"

You will have to search carefully to find two of these amps that don't buzz.  Go to the music store, and turn the volume up past halfway, (clean) gain up past halfway, and the treble up to seven.  My bet is that you will hear the power mains hum.  Plug in a guitar (or Rhodes), and it may be worse.

Tonewise, these amps are pretty lifeless.  Even teenagers can tell they suck, and they get discarded as soon as the kids can afford a better amp.  There is no way that I would pay $300 for a pair of these.  That $300 might get you other gear you really need, or a GOOD used amp.


Also, try out your chorus idea and speaker placement before you get married to it.  Hook your preamp and chorus into your home stereo or borrowed amps to check out the atmospheric effect in your practice room.  Speaker placement will make a big difference (I think on the floor on either side would be my first choice too).  Hearing the setup will help you decide if you really want to spend the money on a pair of amps.  (You will either be totally pumped up, or you might say "ho hum, I think I'll save the cash."  Or maybe you will say "That's awesome, sounds great, but I can live without it.")


sean
#831
Ah.  There is no accounting for taste.

To each his own.

I love playing with the harp cover off.  I like the look a lot.  
I have no affection for the flat-top Mark II cover at all, however, I adore the round top cover.  So for me, I like the cover off the Mark II piano, and the cover left on my Mark I.

I think the clear plastic harp cover is a cool idea, but I would have to withhold judgement until I can see one up close and see how I react to it.

I love the idea of nickel-plated tonebars.  Love it.  Cool.
#832
Considering that the action is not to your liking, and the price is top dollar, I think you can find a Rhodes that it better suited to your needs for less money.
#833
The Fender Rhodes Electric Piano / dealers or websites?
January 22, 2009, 10:32:12 AM
Eric -

Served up on a silver platter, after waiting only three days:

http://washingtondc.craigslist.org/nva/msg/1002979187.html


This is the second Rhodes on CL this month.

Good luck.
#834
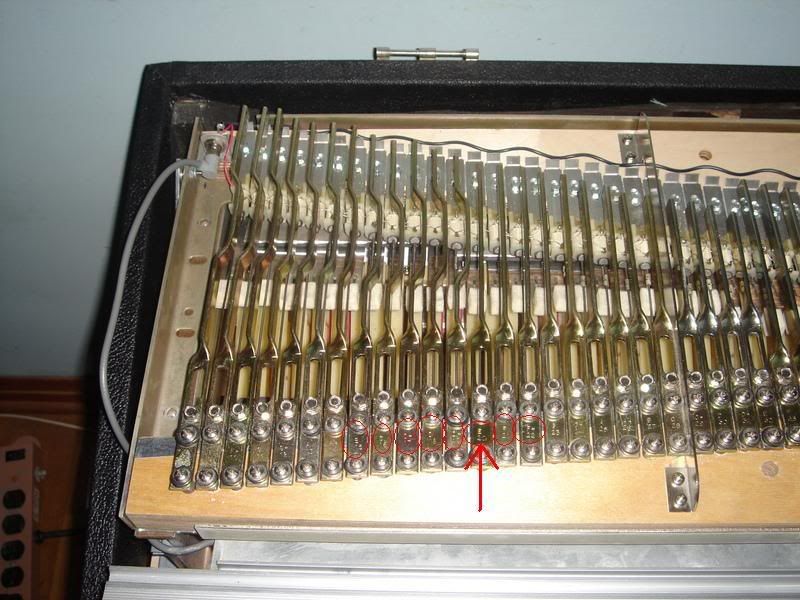
At the back left corner of the harp, there is an RCA jack in plain view.
Gently unplug the grey cable, and run a cable from this RCA jack to your external amp.  (Use an RCA-to-quarter-inch adapter, and just plug in to your guitar amp.  A keyboard amp or power amp without any preamp gain is less than ideal.)

See the jack I am talking about in this photo (upper left):


If the distortion you are concerned about goes away when you bypass the VV preamp, then the problem is in that preamp, and you should contact Chris at VV, and ask for an explanation or repair.  They are good folks, and I am sure they will make it right.


If the "distortion on hard notes" does not go away, then you have encountered that nice honk that the Rhodes will make with a good hard whack on certain tines with a certain strike line.  You can either learn to use it musically (like most folks), or you can adjust the action or strike line to prevent the honk.
#835
On those top twelve notes, sustain is a larger problem than escapement and tinetip-aimed-at-pickup voicing.

Late in the life of the Mark II, the rubber standoff replaced the springs-and-grommets mounting for the top twelve notes.  

The good thing is that you can get good sustain on those high notes with the single-screw and standoff mount.

The bad thing is that you can't really change the tine positioning very well at all.

If you have problems with the hammers blocking against those upper tines, you would normally just add a shim under that end of the harp.  [You could optionally modify your hammer tips (smaller strip of wood wrapped in shrink tubing).  I have seen both solutions, but I can't imagine going to all the work of the hammer tip modification.]

If you have a problem with the tines not meeting your expectations of perfect positioning in relation to the pickups, your options are:
- leave it alone, and realize that the tone does not change dramatically when tiny adjustments are made in this octave,
- bend your pickup mounting tang.  Pretty easy to do, but it is very hard to make a huge change without having the pickup get in the way of either the damper felt, or getting whacked by the hammer itself.  Not worth the trouble.
- put a cardboard shim under the pickup mounting tang.  Easier than bending the tang; try it on one note, then give up.


I think on the top end of [at leaste one of] my pianos, the tines are well above the pickup rivet-tip, and very very close in.  They are so close that they would touch the rivet if they had a huge swing (like the longer tines do), or if I push down on the tone bar.  (Sorry, I am at work, so I can't confirm or better describe.)
#836
The Fender Rhodes Electric Piano / dealers or websites?
January 20, 2009, 12:35:39 PM
Michael,

I stand corrected.

Sean
#837
The Fender Rhodes Electric Piano / dealers or websites?
January 19, 2009, 08:12:38 PM
Good news and bad news.
The Bad news is that I am in MD too, so you have to beat me to the Rhodes.


The Good News is that I am about swamped with the dang things.  I got four.   So I won't be buying any this summer.  (Except if the one I sold will come back to me.)


Keep your eyes on craigslist http://washingtondc.craigslist.org/msg/
There seems to be about one a month.   Eventually, yours will come along.  Springtime should bring a few out of storage.

Atomic Music in Beltsville gets a Rhodes now and then.  http://www.atomicmusiconline.com/  The Beltsville store is your best bet.  The store in Rockville is tiny, and I haven't seen a Rhodes there since they downsized, but you could give them a ring every once in a while.  (Atomic usually announces their Rhodes's on craigslist until it gets flagged off.)

Since you mentioned that you wanted a "deal", I assume you are not looking to pay a fair price for a pro-ready fully-restored Rhodes.  If this is within your means, you should check out the good folks in York PA and NJ.

York PA:  http://www.speakeasyvintagemusic.com
NJ: http://www.vintagevibe.com/


And you should see the "selling and shipping" section of this fine forum:
http://www.fenderrhodes.com/forum/viewforum.php?f=5&sid=81129467b25bbd480dd05d3822a4e1e3

Tom's 54 would fit in your back seat.
#838
Herbie showed up behind dark glasses and a Rhodes Suitcase on the steps of the Lincoln Memorial.  Many postings on youtube already:

http://www.youtube.com/watch?v=FO6wCO5LxCg
http://www.youtube.com/watch?v=RnJXBQGY3lc
http://www.youtube.com/watch?v=VcKZlmCZWBY
etc.


Stevie and his D6 also were a treat to watch:

http://www.youtube.com/watch?v=LHRZ-6biyMw
http://www.youtube.com/watch?v=kK0dqUncVJQ


HBO ran it unscrambled, and they will run it again... http://www.hbo.com/
#839
I would bet ten bucks that it wouldn't last six months.

The ABS plastic flat-top might be able to hold the weight of a 56-lb Wurlie 200 in a steady-state well-controlled situation just fine.
(and if you buy one from SpeakeasyVM, you would ask them specifically if their top is designed to support a Wurlie.)

H O W E V E R ...  
(cue ominous tuba and timpani "duh duh duuhhhh" sounds)...

Even in a studio, I expect there will be an occasion when somebody gets the "great idea" to move the keyboards for better ergonomics, or they get too energetic during their favorite wurlie lick ("Jerimiah was a bullfrog, C, C#, CRACK!" DOH!), or they tilt up the Wurlie to see where the pedal connection would go if it wasn't blocked by the Rhodes, ....

I just think it would be all to easy to turn out ugly.

I would never think anyone would expect to put their Wurlie on top of their Rhodes in a gigging situation, because you can't guarantee roadies (or your buddies and bandmates) will actually understand the delicacy of the situation.  They are used to stacking wooden boxes on top of wooden boxes, amps on amps, etc.  They are not normally asked to stack heavy stuff on light delicate stuff.  There will come a time when the Rhodes top doesn't survive the gig.


It will cost you less to make a DMP-like shelf-supported-by-triangular-blocks (even if you make it pro-studio-pretty) than the cost of an ABS flat-top.  If you don't have a woodshop or tools, your drummer's friend knows a guy who might do it for fourty bucks and a sixpack.

But, after all my rambling, you know what I can't stop scratchin' my head about?  I can't imagine being willing to play my wurlie without the sustain pedal.  

Sean
#840
A slight refinement on the project is to mount the splitter switch and output jack in the cheekblock.  I haven't made any progress on actually doing it, but I can't stop thinking about it.

I swear I thought of this before I saw Chris & Co.'s excellent powersupply-in-a-cheekblock (but you'll never believe me on that, will you?).

See http://www.vintagevibe.com/p-553-fender-rhodes-piano-suitcase-cheek-block-power-supply.aspx
#841
The Fender Rhodes Electric Piano / Guide pin lube
January 08, 2009, 09:34:14 PM
Hey Mike!

Can you shed a little light on which parts got silicone spray, and how was it applied.  What year do you think the silicone spray was first used?

Was it used on all pianos, or was it just used on pianos or parts that didn't want to behave?

We have read that the pedestal felts got some spray, but if you could tell us how much they were sprayed, did the factory let them dry before installation or were they sprayed while already installed, tips and tricks, etc.

Was silicone applied to the felts on the underside of the hammers? After they were installed on the hammer combs?

Did any other parts get a spritz of lube?

Any comment would be appreciated.

Thanks heaps,

Sean
#842
I have a Yamaha P80, and I absolutely adore it.  It is compact and light, and has a simple interface that anybody can use with zero training.  Guest musicians instantly find a voice they like, and change voices when they want, and they can kill the reverb or tremolo in the middle of a melody.  Zero frustration.  The action is awesome, but maybe heavier than most would prefer.

The piano sounds are wonderful, and the other sounds are generally good and useful.  The jazz organ may not be your favorite jazz organ sound, but it is useable.  The four Rhodes sounds cover a variety of playing situations, and I play one of them a lot.  (I wish it had a wurly sound, I wish it had a clav, oh well.)  

The leslie effect on the jazz organ has one awesome feature:  when you switch from the plain jazz organ sound by pushing the "variation" voice button, you can hear the leslie rotor speed up, and when you return to the plain non-vibrato jazz organ voice, you are treated to a delayed transition as the rotor slows down to a stop.  Pretty cool.

The P85 came out with a lower price, and still has 64-note polyphony, and adds built-in speakers!   The P85 has fewer voices (fewer piano varieties, it has vibes, but still TWO harpsichords?), the sequencer has only one track instead of two.  It looks like the P85 can't split the keyboard into two zones.  Can the P85 layer two voices if you push two buttons?  The P80 and P90 can split or layer two voices.

In addition to the midi in and out, the P80 has an interface intended to hook up to your home pc, does the P85 have that?  I have never used it on mine.

There may be other non-obvious cost-saving differences:
There is a subtle and mysterious difference in the language that Yamaha chooses to describe the action on the P85.  It differs from the P80 and P90, but I don't remember if I could tell the difference when I played them in the store.  There is also a slight difference in the description of the sampling technology used, but they all sound mostly identical to human ears.  Maybe the differences in marketing language is simply differences in japanese-english translation choices made by different translaters at different times.

After playing the Yamaha so much, I can't get comfortable playing the Roland actions, and I don't like the Roland piano sounds on their RD-series.

I haven't spent any serious time with a Kurzweil so I can't compare the P80 to their renouned beauties.


Oh, I do hate hate hate that damned wall-wart power supply that the P80 has.  That is the one thing that makes the P80 NOT road-worthy.
#843
The Fender Rhodes Electric Piano / Guide pin lube
January 07, 2009, 09:58:27 PM
Okay, I am done fixing my typos in the previous post, and I want to add:


JB - You should make sure that your guide pins are indeed nice and smooth, and that there are no fibrous wood bits rubbing between one key and the keys next door.  If you have a sticky or sluggish key, remove his neighbors from the piano, and test that naughty key by his lonesome.  If the key behaves differently when isolated, then obviously you have a rubbing problem.

I have never seen overly-tight bushings at the balance rail, but I guess that should be investigated.  (You should also inspect the balance rail pins to see that they are nice and smooth and shiny, not rusty or pitted.)

It makes my skin crawl to watch the Vintage Vibe video where he enlarges the hole in the bottom of the key for the balance rail pin, but maybe there are some pianos that bind at that location.  (Enlarging this hole is very dangerous if you are concerned with side-to-side sloppiness of the key.)  Chris and the others at Vintage Vibe have the experience to do this safely (and seemingly non-chalantly), but I don't think I want to experiment on my pianos.

Sean
#844
You want to use a lubricant that:
 1.  Will not thicken and get gummy over long periods of time,
 2.  Does not have powerful solvents that will melt plastic keys, hammers, pickup bobbins, rubber grommets, rubber hammer tips, etc.
 3.  Does not have powerful propellents that will disolve stuff op. cit.
 4.  If propelled (sprayed) by some solvent, the solvent must dry cleanly.  
and most importantly of all:
 5.  Is cheap enough for a musician to afford, and findable in a store.

So the winner is...  

My choice is CRC Heavy Duty Silicone Multi-Use Lubricant No. 05074.


My local Ace Hardware sells it in individual cans, and I paid $3.19 for the last can I bought in 2004 (the sticker says so).

The only problem with this stuff is that it squirts out of the can so powerfully, but, alas, that is a problem with all spray lubricants.

NEVER spray it on anything while the part is still installed in your piano, and never spray it near the piano.  (Okay, I might have broken this rule once or twice.)  


If you want to lubricate the felt bushings that are glued into the bottom of the keys, please don't spray the lube in there.  Take your spray can out into the back yard, and spray some of the silicone into a glass jar until you see about a tablespoon of lubricant puddled in the bottom of the jar.  Put the lid on the glass jar.  Then take your keys out of your piano, put them in your big cardboard box, drag it all out to the garage, and carefully put the silicone lubricant on the felt bushings with an eye dropper or a hypodermic syringe  (Arts and Craft stores sell them, or if you have a friend that is diabetic, you can bum one.).


To lube the pedestal felts, take a big cardboard box, and line up all the keys side by side in the box.  Take the box out to the garage or back yard.  Use more cardboard and tin foil to mask off all the parts of the keys that you don't want to get overspray and splashes on (that means cover all the rest of the keys so that all you can see is the pedestals).  Carefully spray the pedestals one by one with a light coating of spray.  Then put the can down, and go take a walk to let clean air into your lungs, and to allow the solvent to dry from the pedestals.  Then go back and spray each and every pedestal again with a second light dose of spray.  Again, take a walk and wait.  

I usually stop there, but if you want more lube in the felts, I guess you can repeat the spray and dry cycle a few more times (but I don't think you need all that much of the silicone on the felts, twice is enough).  If you are unlucky and spray too much at one time, there is the chance that you will soften the glue that holds the felt in place.  

I always wait until the next day to re-install the keys, but I guess a few hours would guarantee that no significant solvent remains in the felts, and there is no significant danger to melting any of the plastic or rubber piano parts.  The pedestals will not feel oily to the touch, and they don't feel slippery to me at all.

Now, there is some amount of literature pointing to other Silicone lubricants, but in my search for the right product I came to the following conclusion:

The alleged replacement product for the factory-specified lubricant is only available in paint stores via special order in case lots (and you have to bypass the teenager employees to get that done), AND it is not the same stuff that it once was.  The solvents and propellants have changed, even though the product has the same old name.  (I am talking about the Sprayon product.)

Also, I believe that the various "food grade" Silicone lubricant sprays might be just fine, but I have not tested them and I can't find a source for single-can supply.
#845
I get tired of using the needle nose pliers.  They are just not the right tool.

Go to the dollar store, and buy a cheap-and-nasty screwdriver.  Then file a little notch in the tip of the blade, and you have a good tuning tool.

OR... If you have two or four bucks to spend, you can splurge:

You can buy a tack puller from just about any good hardware store.

Maybe one just like this:
#846
The Fender Rhodes Electric Piano / Doh! I forgot....
January 04, 2009, 11:45:14 PM
So, maybe drilling a hole and cutting new threads is a hassle.

Use the existing threaded hole in the harp support by carefully marking and drilling a new hole above it in the harp frame.  Duh.  That is the much simpler fix.
#847
The Fender Rhodes Electric Piano / Strike line
January 04, 2009, 09:12:22 PM
You should set the strike line by ear and ear alone.  The strike line is sometimes a bit of a compromise, so you should let YOUR ears be the ones that decide where you want to leave it.  

Mark your current strike line with a pencil mark on the harp and a matching pencil mark on the support at each end.  Then loosen all the screws and start moving the harp around while you play.


You will find that you have nearly no room for movement on the treble end because you are stuck between the damper felts landing on the pickups, or the hammers hitting the tine mounting block and getting stuck.

Once you have arrived at the perfect strike line according to your ears, mark it with a pencil.  Then you get to decide where to drill.

Before you drill, tape a piece of cardboard against the inside of each harp support to keep the drill shavings from landing on the piano guts.  They are easy to vacuum out from between the harp support and the side of the piano case.

Newer harps will have extra slotted holes on the bass end that you can use.  (My harp from 1973 has extra holes, but they aren't slotted.)

Since your 1978 piano has aluminum harp supports:
Tap the harp support for a #12-24 screw (check that this matches the screws you removed).  (You could switch to M8-1.25 outside the Metricphobic States of America).  

If you don't want to cut threads, you might be able to get a nut on the underside with minimal cursewords and cut knuckles (because you will probably have to grind off one side of the nut to fit in the tight clearance).  Before you drill, take a close look at the underside to make sure you have room.  You probably don't, so go to the hardware store and buy a tapwrench and a #12-24 tap (and an 11/64" drill bit).

Normally, you would be generous with lubricating oil when you tap threads, but you don't want to get oil all over the piano, so I would try to go completely without oil.  A #12 tap is big enough that it is unlikely to snap.  The aluminium is soft, and you don't have to go fast.

After each and every turn of the tap, turn the tap backwards one turn to clear the hole of shavings.  No hurry.  Clear away the bits of shavings with every turn.

Pretty good thread-cutting directions:  http://www.diynetwork.com/diy/tl_metalworking/article/0,,DIY_14390_2270183,00.html
#848
Classic & Modern Fender Rhodes Artists / Random indeed.
January 02, 2009, 10:14:18 PM
I am not sure that the audience is actually in the same room with him.  They seem entirely too excited to be responding to his singing and prancing.  

If you watch it with the sound off, he looks even more maniacal.

I don't think I wanna listen to it again to check for sure, but the one time I subjected myself to the full duration, I did not hear a single sound that might have come from a Rhodes.
#849
It looks like only that single green-wound pickup would an original 1965 pickup.

Bizarre to see the flipped-bobbins; I wonder if they were just factory screwups.  How 'bout a few pix of those flipped pickups at the treble end?

Also note that there is no welded harp frame.  No angle-iron running the length of the harp in front or back.  Nice.

You would be doing this forum a great service if you took a few detailed photos of the Raymacs and also of the curious tonebars.

What metal do you think the tonebars are made of?  Wouldn't aluminum be too light?  Are they zinc or steel?
#850
I was manning the remote for my four-year-old while she was watching the disney channel, and one of the filler-videos contains a Green Student "Jetsons" Rhodes....

The artist is Ralph Covert, and thanks to google, I found the clip on Yahoo:  http://video.yahoo.com/watch/3401355/v184536127

The sound is definitely not Rhodes, but the cameo appearance is all Rhodes.  I guess they used her just for her pretty face....