- Welcome to The Electric Piano Forum.
News:
Follow us on Twitter for important announcements and outage notices.
Recent posts
#91
Other Keyboards & Software Synths / Re: Help with pianet
Last post by thinzappa - November 01, 2023, 04:34:20 AMI have the very same issue as this one and would very much like some tips on how to do some proper tests!
#92
The Fender Rhodes Electric Piano / The Secret Rhodes Piano Room: ...
Last post by Cormac Long - October 28, 2023, 06:11:33 PMAn entertaining video from Dr. Mix from a visit to Ben Bove's living room 
https://www.youtube.com/watch?v=ttGPyYRWAN8
https://www.youtube.com/watch?v=ttGPyYRWAN8
#93
The Fender Rhodes Electric Piano / Re: Post your Rhodes pics and ...
Last post by longshadow71 - October 28, 2023, 02:42:01 PMThis was posted on Facebook Marketplace as "Free Organ". It was posted by a friend of my wife. I immediately drove to her place to snatch it up and I even offered cash, which she refused. Complete with cover, which needs some restoration as well. Problem is, I only hear tones from about 6 notes around the lower register. Still worth putting some $ into, I believe.
#94
The Fender Rhodes Electric Piano / Re: Damper Module Adjustment
Last post by bloke66 - October 28, 2023, 07:16:02 AMHmmm what I'm trying to say is what shape are these modules when new....are they flat with the factory kink in the end or are they curved with the kink? Would I just straighten up the out of shape bits and leave the curved shape?
Thanks
Thanks
#95
Parts, Service, Maintenance & Repairs / Re: The Complete Guide: Painti...
Last post by Oaklandjake - October 26, 2023, 09:12:27 PMHey, I did my mk II using similar technique. I removed all the orange peel texture but didn't address the imperfections (they look like wrinkles) did you address them? I may go back and redo it (I used a rainbow flake over black and may do a different base). I'm thinking bonding glaze, assuming it's compatible with plastic.
#96
Other Keyboards & Software Synths / Re: Homemade electric piano (S...
Last post by gotkovsky - October 26, 2023, 06:12:41 AMQuote from: Rjj107 on October 25, 2023, 07:28:48 AMI'm thinking about having a go at making an ep. Probably using reeds from hacksaw blade type material. I see other projects ongoing and I'm wondering about the keys and hammer action.The others are making their own keys and actions.i know the finished project won't sound like a vintage wurly but it could be fun. Has anyone tried to build an ep using salvaged keys and actions from an accoustic piano?? Is there a reason that might not work? Any suggestions welcome. I think the project time could be halved if a ready made keybed and action could be used. Any thoughts?
I think people avoid using reclaimed acoustic pianos actions because the hammers are way bigger than Rhodes or Wurlitzer hammers. But if you have access to a full piano keybed and actions, the best is always to experiment and see what works and what doesn't.
I don't think there are so many people who have the time and patience to build pianos, and even less people who share their work on that online. So I suggest to always take what you read about piano building with a pinch of salt, including my own advices and opinions. I've read several times that it wouldn't be possible to use an acoustic piano action to actuate reeds or tines because of their sizes, but I never saw a definitive proof that it wouldn't work. After all, maybe it is possible to modify the hammers? Or replace them with something smaller? But could these modifications affect the playability of the action? Design choices lead to lots of questions and the first advice I'd give is to experiment, experiment, and experiment before commiting to build an instrument. Also to divide the building of an instrument in several blocks and consider all these blocks as separate projects. Like first working on the tone generators. Then on how all the tone generators are mounted on some kind of harp, then the keyboard, etc.
Best of luck with your project, please feel free to share your work here.
K
#97
Other Keyboards & Software Synths / Re: Homemade electric piano (S...
Last post by gotkovsky - October 26, 2023, 05:58:06 AMHello everyone,
Sorry for not giving news for so much time... I just had a great email this morning from Tiago Valente, the creator of the Valente Piano, who's also on this forum, which really cheered me up, and made me think about this thread that I completely abandoned, which is a shame. It must be really frustrating for people who come across this thread to not be able to hear the piano after reading all the details of its construction.
The piano is done and I've been using it for quite some time on my own music, learning how to play at the same time. Unfortunately, I've not been able to release any finished music for the last couple years, mainly because I'm going through health issues and turning music drafts into finished songs is difficult.
But of course I'm not giving up, these last months I've been closer to complete some songs, which all feature my piano, so I promise that I'll post them on this thread as soon as I release something.
That would be better than posting a clip of me playing the piano in a solo context, I'm just not a good enough piano player, and that wouldn't give an interesting preview of what this piano is capable of.
I can say for now is that most of the bass range of the piano is quite hard to use, as overtones are overly present in my opinion, and that the treble range is almost unusable because the treble reeds have close to zero sustain. But the middle octaves of the piano sound really good, pretty close to a Wurly, so the piano can be used as an accompanying instrument with good results.
I also wanted to record an album with my piano with an ex-music teacher of mine which is a great player, but unfortunately the project didn't make the cut, so this will have to wait again.
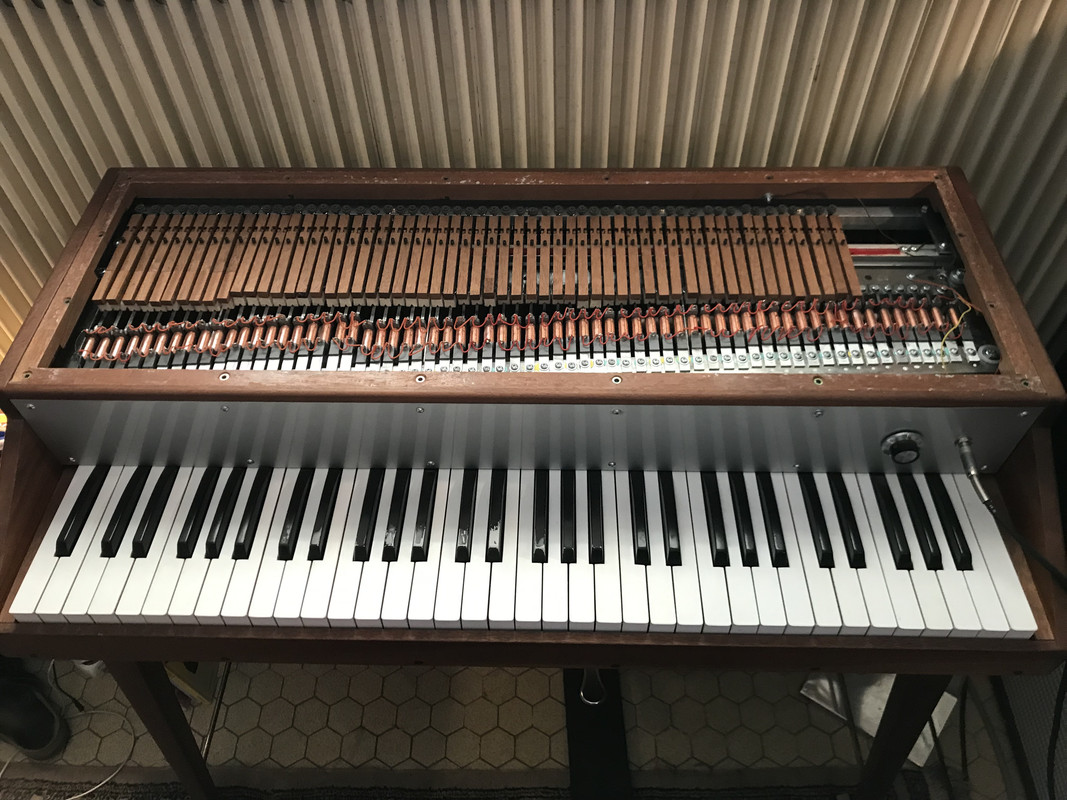
Anyway, the best I can do now is post the last picture of the piano that I took a few months ago, when I had to fix a hammer felt, and promise that as soon as any music featuring this piano will be released, I'll post these here.
Cheers,
Kevin
Sorry for not giving news for so much time... I just had a great email this morning from Tiago Valente, the creator of the Valente Piano, who's also on this forum, which really cheered me up, and made me think about this thread that I completely abandoned, which is a shame. It must be really frustrating for people who come across this thread to not be able to hear the piano after reading all the details of its construction.
The piano is done and I've been using it for quite some time on my own music, learning how to play at the same time. Unfortunately, I've not been able to release any finished music for the last couple years, mainly because I'm going through health issues and turning music drafts into finished songs is difficult.
But of course I'm not giving up, these last months I've been closer to complete some songs, which all feature my piano, so I promise that I'll post them on this thread as soon as I release something.
That would be better than posting a clip of me playing the piano in a solo context, I'm just not a good enough piano player, and that wouldn't give an interesting preview of what this piano is capable of.
I can say for now is that most of the bass range of the piano is quite hard to use, as overtones are overly present in my opinion, and that the treble range is almost unusable because the treble reeds have close to zero sustain. But the middle octaves of the piano sound really good, pretty close to a Wurly, so the piano can be used as an accompanying instrument with good results.
I also wanted to record an album with my piano with an ex-music teacher of mine which is a great player, but unfortunately the project didn't make the cut, so this will have to wait again.
Anyway, the best I can do now is post the last picture of the piano that I took a few months ago, when I had to fix a hammer felt, and promise that as soon as any music featuring this piano will be released, I'll post these here.
Cheers,
Kevin
#98
Other Keyboards & Software Synths / Re: Found a Pianet N! I have m...
Last post by Alan Lenhoff - October 25, 2023, 01:29:23 PM>>Which out do I use 300mV, 300mV low impedence, or 100mV>>
I use the 300mV (upper left-hand one) with my Peavey KB-100 amp, and it works quite well. But you could try them all, and see what works best for you.
Not sure what the ground plug is. I don't use it.
>>I'm just using a 2 prong extension cord. >>
The original is just a two-prong cord.
>>Is it worth doing the shielding tape thing across the keys?>>
No. That process was invented by my friend (and Classic Keys co-author) David Robertson to ground the keys to eliminate the nasty static discharges caused when using the silicone replacement sticky pads sold by Clavinet.com. The pads sold by Ken Rich are like the originals, and do not create a static discharge. My Pianet N (with Ken Rich pads) plays without any of those stray noises or hum, without any added grounding of the keys or shielding. With the proper pads, the original design works just fine. The tape grounding also makes it very difficult to remove keys for cleaning or other maintenance.
Enjoy your new instrument!
Alan
#99
Other Keyboards & Software Synths / Re: Homemade electric piano (S...
Last post by Rjj107 - October 25, 2023, 07:28:48 AMI'm thinking about having a go at making an ep. Probably using reeds from hacksaw blade type material. I see other projects ongoing and I'm wondering about the keys and hammer action.The others are making their own keys and actions.i know the finished project won't sound like a vintage wurly but it could be fun. Has anyone tried to build an ep using salvaged keys and actions from an accoustic piano?? Is there a reason that might not work? Any suggestions welcome. I think the project time could be halved if a ready made keybed and action could be used. Any thoughts?
#100
The Fender Rhodes Electric Piano / Damper Module Adjustment
Last post by bloke66 - October 25, 2023, 04:40:47 AMHi
I need some advice on how to straighten this Damper Module.
I don't know which one to use as a reference to get them all the same.
Any help will be great.
Cheers
I need some advice on how to straighten this Damper Module.
I don't know which one to use as a reference to get them all the same.
Any help will be great.
Cheers